Posts

Access Windows 10 Share from Ubuntu 20.04 Desktop

Image
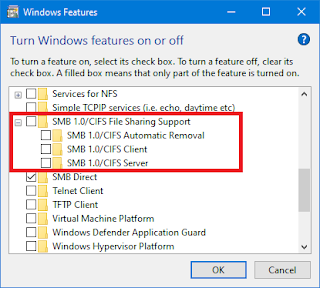
If you have a Windows 10 machine and would like to access a Network Share from Ubuntu 20.04 Desktop, there are a few things to keep in mind: Turn Off SMB v1.0 Protocol from Windows 10 The SMB version 1.0 protocol is very insecure and is being deprecated by Microsoft in Windows 10. In order to ensure your Windows 10 Network Shares are secured by more recent SMB protocol versions, turn off SMB v1.0: Figure 1: Turn Off SMB v1.0 Protocol Nautilus Cannot Browse Windows 10 Network Shares When you turn off SMB v1.0 Protocol, Nautilus can no longer browse the Windows 10 Network Shares and gives the following error: Unable to access location Failed to retrieve share list from server: Network dropped connection on reset Figure 2: Unable to access location Manually Connect to Windows 10 Network Shares In order to connect to a Windows 10 Network Share using Nautilus with the SMB v1.0 Protocol disabled, you must enter the smb://CO

Use SMTP Email Service From Google

If you are in need of email services and don't have your own mail server, one of the options you can use as a G Suite customer is Google's SMTP mail service. The following instructions use Postfix to be the localhost mail delivery daemon: 1. Install Postfix sudo apt install postfix 2. Configure Gmail Authentication The best option is to enable Two-Factor Authentication (2FA) on your G Suite account so that you can create App Passwords. These passwords are used in place of your regular G Suite password when configuring Postfix as a relay mail server. Once you have enabled 2FA for your G Suite account, find the latest instructions from Google's help section on creating App Passwords on your account. 3. Add G Suite User and Password to Postfix Usernames and passwords are stored in the /etc/postfix/sasl/sasl_passwd file: Open or create /etc/postfix/sasl/sasl_passwd and add the SMTP host, username, and password accordingly for G Suite: [smtp.gmail.com]:587 user

Change OneDrive Folder Location on Windows 10

Image
If you have separate drives in your PC, one for Windows 10 and applications and another for data, you will want to move the OneDrive folder from the default C: system drive to the D: data drive. Doing this is not straightforward but can be accomplished by following the steps below: Change OneDrive Folder Location In the System Tray found in the lower right portion of the Taskbar next to the date and time, left-click on the OneDrive cloud icon. Click on More and then Settings Open OneDrive Settings From the Account Tab , click on the Unlink this PC link. Confirm when asked to unlink your account Unlink this PC Next setup OneDrive again by logging in with your Outlook account username and password Setup OneDrive When OneDrive setup shows you the location of the OneDrive folder, this is the opportunity you have to change the folder location Change OneDrive Folder Location That's it! OneDrive will now resync to the new folder location.

Manage Meltdown and Spectre Vulnerabilities on Windows 10

Image
The defects named Meltdown and Spectre affect Windows 10 systems running on both Intel and AMD processors. Shared resource environments, such as virtual machines and containers running in cloud environments, are the most vulnerable to these exploits as one virtual machine could improperly access information from another. However, if you are just using Windows 10 on a standalone PC, the threat of a Meltdown or Spectre attack is limited. Here is how to manage the Meltdown and Spectre patches on your Windows 10 PC: Install SpeculationControl Module In January 2018, Microsoft released a PowerShell script to check if your PC is vulnerable to Meltdown and Spectre. Press Win+S and search for PowerShell . Right-click and select Run as administrator Run PowerShell as Administrator Check the current ExecutionPolicy to make sure PowerShell will allow you to run scripts Type Get-ExecutionPolicy and press Enter If it says "Restricted", then type Set-ExecutionPolicy

Maximize Google Chrome GPU Performance on Windows 10

Image
Ever feel like Google Chrome is still slow even with the latest hardware? Or experience screen tearing or flickering with an AMD FreeSync setup? Good news. There are several optimizations that make Google Chrome run buttery smooth under Windows 10. System Configuration The optimizations were made with the following system configuration: Windows 10 Pro 64-bit Chrome version 72.0.3626.109 AMD Radeon Software Adrenalin 2019 Edition version 19.2.2 GIGABYTE Radeon RX 570 4GB Video Card LG 34CB88-P 34" Ultrawide QHD 21:9 Curved AMD FreeSync 75Hz monitor chrome://flags Settings Open a new tab in Google Chrome and type "chrome://flags" in the URL bar. Then search for each of these flags and make the following changes: GPU Rasterization: Force-enabled for all layers This setting will force Google Chrome to always use the GPU for rasterizing web content Out of Process Rasterization: Enabled This settings performs Ganesh raster in the GPU process Zero-C

Turn Windows 10 Features On or Off

Image
In order to turn Windows 10 features on or off: Press Win+S and search for Turn Windows features on or off Open the Control Panel window from the search results Disable Internet Explorer on Windows 10 For some reason, Windows 10 still ships with Internet Explorer 11. Even though it also has Microsoft Edge. And most people download Google Chrome or Firefox anyway to browse the web. Find the Internet Explorer 11 feature in the Windows Features dialog window and uncheck it Windows Features will ask you for confirmation. Select Yes Disable SMBv1 Protocol The WannaCry and Petya ransomware attacks both exploited weaknesses in the SMBv1 protocol. Microsoft claims SMBv1 is no longer installed by default as of Windows 10 Version 1709, but you should check to make sure it is actually disabled on your PC. Find the SMB 1.0/CIFS File Sharing Support feature in the Windows Features dialog window and uncheck it Enable Hyper-V Microsoft Hyper-V is what is known

Windows 10 Won't Wake Up Using Keyboard or Mouse

Image
If It Ain't Broke, Break It This seems to be the common theme lately for Windows 10 releases. Issue: Lock Windows 10 using Win+L and cannot wake with keyboard or mouse My environment is that I use a USB hub that I connect my USB keyboard and mouse to and then I have that hub connected to multiple computers. A poor man's KVM switch, without the V (Video). This thread on the Microsoft Community forum identifies the same issue dating back to August 24th, 2015. A bug that has been in Windows 10 for over three years now and still with no fix. The thread has been closed or else I would have posted the solution there directly. Fix What Microsoft Refuses to Fix The solution is quite simple: Press Win+S and search for Device Manager At the very bottom, expand the Universal Serial Bus controllers entry Right-click on every single USB controller. If a USB controller has a Power Management tab (not all do), then select that tab Uncheck " Allow the co